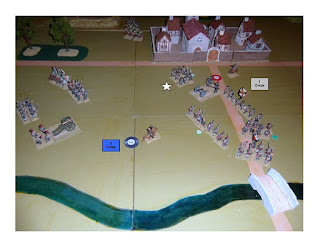
Tactical
map of battle area
General Kliest, commander of 1st Prussian corps,
has orders to hold the town of Celle, which is on the right flank of the
Prussian army.
General Barrois, commander of 3rd French corps,
had been ordered to cross the river Weser and threaten Celle. This attack is intended to draw the Prussian
reserve to the north, and away from the main French attack planned on the
southern flank.
French – 16000 infantry, 1000 cavalry, 30 guns
Prussian – 16000 infantry, 1000 cavalry, 30 guns
Table
at start of wargame
To carry out his orders, and avoid a major battle, Barrois
decided to cross north of Celle, and threaten the Prussian flank. To do so he would first have to secure a
foothold on the eastern bank.
On 13th April he sent his dragoon brigade to
recce the far bank, and if possible secure the bridge. They were engaged by a Prussian hussar
brigade, but the dragoons won the melee and the Prussians withdrew.
At first light on 14th April the French crossed
to the eastern bank.
Kliest had one division in Celle. His second division, and his corps artillery,
were deployed to cover the road bridge leading to the town. He ordered his hussar brigade to observe the
northern bridge, and the two brigades in the town to join the remainder of the
corps.
0800-1200
The French dragoons again advanced and charged the Prussian
hussars. The hussars refused to counter
charge, and were routed by the dragoons.
This allowed the French to cross the river unopposed. The loss of their cavalry caused some
problems for the two brigades in Celle, one had to form square west of the town
to cover the routed hussar brigade.
However the Prussian gunners caused casualties amongst the French
infantry as they crossed the river and deployed to attack. One brigade suffered 10% casualties, but
held their morale.
1200-1600
The two right hand French brigades advance to engage the
Prussian infantry. Their artillery fire
on the Prussian square in support. The
square receive 10% casualties, but continue to make their morale.
With his corps so widely dispersed, Barrois must decide
which flank to give priority. He moves
to take command of the infantry skirmish on the right. The Prussian artillery is outflanked, and
retreats behind the infantry support.
The four infantry brigades skirmish, but to little effect.
1600-1900
Barrois orders his two brigades to advance and initiate a
firefight. His artillery continue to
fire on the square, who hold their formation despite 30% casualties.
The French win the firefight, and both Prussian brigades are routed. The nearby artillery limber and retreat. The badly damaged square test their morale because of the infantry rout. They lose their morale and join the rout
Conclusion
Kliest has lost three of his four infantry brigades. He orders the remainder of his corps to break
contact and retreat towards Lehre.
The French have lost 1200 casualties
The Prussians have lost 2800 casualties


No comments:
Post a Comment