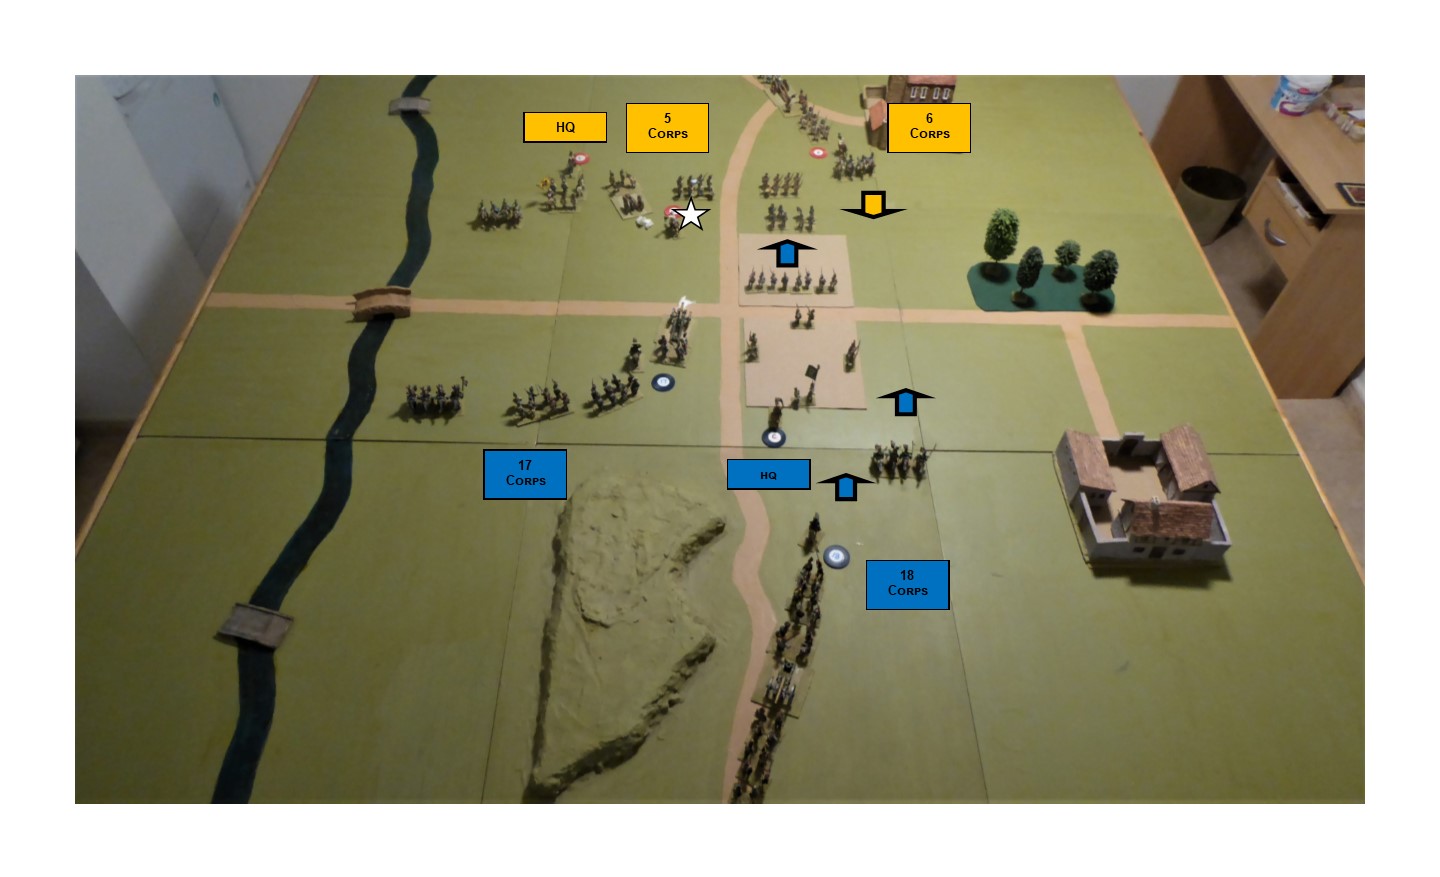
Tactical map of battle
area
9th
Bavarian corps have occupied Bayerbach in a surprise attack
10th
Bavarian corps is moving to support them
1st
and 2nd Austrian corps have deployed to counter attack
Bavarian
– 7 infantry brigades, 2 cavalry brigade, 2 corps artillery
Austrian
– 7 infantry brigades, 2 cavalry brigade, 2 corps artillery
Start of move 1
9th
Bavarian corps is deployed in the centre square
Two
brigades are in Bayerbach, the remainder to the south
Marshal
Massena and 10th Bavarian corps will arrive centre left at the start
of move 1
General
Klenau and First Austrian army will arrive at the start of move 1
1st
corps will arrive top right, 2nd corps centre right
End of move 2
10th
Bavarian corps is moving to the take position on the left of Bayerbach
Marshal
Massena is riding to the town
First
Austrian army has arrived at the top of the photo
1st
corps to the left of the road, 2nd corps to the right.
End of move 4
9th
Bavarian corps artillery opens fire, but no casualties
10th
Bavarian corps continues to advance
Marshal
Massena has taken command of the garrison of Bayerbach
He
has ordered both brigades into the northern half of the town
First
Austrian army has started to deploy
General
Klenau has taken command of 1st corps cavalry and grenadier brigade
He
is moving to the left to threaten 10th corps advance.
End of move 6
9th
Bavarian corps bear the brunt of the Austrian attack
Their
cavalry brigade receive 10% casualties, but make their morale
The
garrison also come under attack
First
they receive 10% casualties from artillery fire
Then
two Austrian brigades advance and skirmish, causing another 10% casualties
Massena
swops the garrison with the reserve brigade
10th
Bavarian corps starts to deploy
1st
Austrian corps launch their attack on the town
Artillery
cause 10% casualties
Two
infantry brigades move forward and skirmish
This
causes another 10% casualties
2nd
Austrian corps artillery concentrate on the enemy cavalry
They
cause 10% casualties, and move forward their own cavalry to attack
The
infantry also move forward, the right hand brigade receiving 10% casualties
End of move 8
10th
Bavarian cavalry charge and rout Austrian hussars
Remainder
of corps hold their ground
1st
Austrian artillery fire on garrison, who receive 10% casualties and are shaken
Two
Austrian brigades then storm the town and rout both garrison and reserve
Garrison
rout with 50% casualties, reserve brigade with 20% casualties
2nd
Austrian artillery fire on cavalry, who now have 20% casualties and are shaken
Austrian
light cavalry charge and rout shaken Bavarian cavalry
End of move 10
10th
Bavarian corps redeploy to hold southern half of town
Jager
brigade enter town and are disorganised by routing infantry
Town
garrison continue to rout through southern half of town
9th
Bavarian corps retreat to hold southern half of town
1st
Austrian corps send Jager brigade into northern half of town
Grenadier
brigade move to rejoin 1st corps
2nd
Austrian corps advance to engage 9th Bavarian corps
End of move 12
10th
Bavarian corps advance and take south Bayerbach
2nd
Austrian corps attack 9th Bavarian corps
Cavalry
force Bavarian infantry to remain in square
Austrian
infantry then charge and rout square
At
nightfall Marshal Massena orders 7th Bavarian army to retreat
Summary
At
nightfall the Bavarians hold south Bayerbach
10th
corps has only suffered light casualties
However
9th corps have lost heavy casualties
Three
of their four infantry brigades are in rout
Their
cavalry are also in rout
Massena
orders a general retreat
The
Bavarians have lost 8 infantry and 4 cavalry casualties (3600 men)
The
Austrians have lost 4 infantry and 3 cavalry casualties (1900 men)